Pajama pants are the perfect project for teaching yourself to sew clothes.

Just before we get to the good stuff, I want to tell you the reasons why I think pajama pants are THE perfect beginners project for those who want to sew children's clothing, some of these even apply to starting out sewing adults clothing. And here are the reasons:
- You cant really get it wrong. PJ pants only have a few seams, and because the style is baggy your mistakes are easily covered.
- Cutting accuracy is not important.
- Seam allowance accuracy is not important.
- You wear PJs at home, meaning no pressure that they have to be wearable in public.
- They are a fast project.
- I guarantee that when you finish you will feel a sense of accomplishment, you have actually made something your child can wear.
- Fabric is cheap and it doesn't really matter what type you choose. Again, the baggy style means that you could sew these up in just about anything, such as non-stretch cottons such as traditional flannelette, or even stretch material like an old t-shirt that your hubby doesn't wear anymore. You could even use an old pair of tracksuit pants, or even a light cotton, depending on what you want to use them for.
- I can vouch for my pattern here, I sewed this mostly without pins. This means that the pattern is accurate and you aren't going to have to deal with pattern mistakes (which are hard to deal with as a beginner, generally beginners blame their own sewing ability when it may have been an inaccurate pattern, but how would they know the difference?).
Can you see my point here? I am not saying that you don't at least try to cut and sew accurately, but if you are a beginner just starting out, your beginner mistakes are hardly noticeable in the end result.
For all of the reasons above this is also an awesome sewjo pick me up! (We all need one of those sometimes.)
Pajama Pants Pattern and Tutorial
Updated - 26/02/2014This pattern has had an update. It has been reformatted to include layers. When you open the PDF file, you will see the sizes listed and can select or deselect sizes for printing. A big shout of praise to Laura from Titchy Threads who has brought the use layers to the PDF pattern community, and it is an incredible feature in her patterns.
Click here to download the pattern.
In return for downloading the pattern, I ask that you please sign up to my newsletter.
Follow this link to view what the testers for this pattern made.
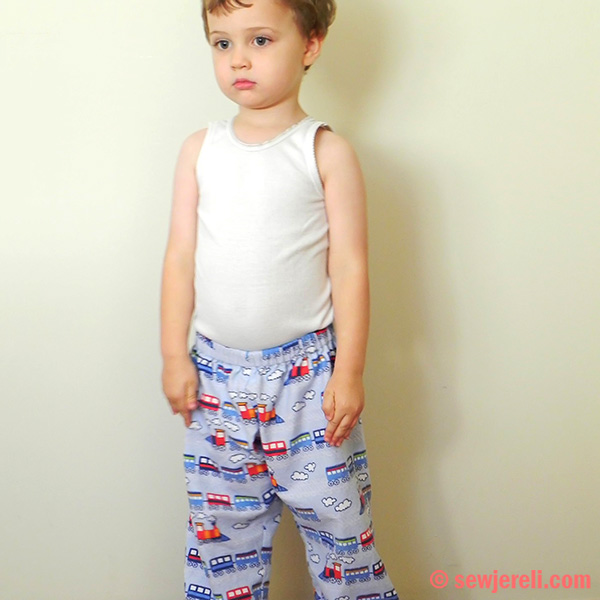
This pattern is a one-piece pants pattern, drafted to sit lower on the hip. It is a pet peeve of mine that my toddler's PJ pants always end up coming off, because as toddlers run around, the high drafted waist ends up falling down to their natural hip, then the pants get tugged around their ankles and they get pulled off naturally as the toddlers walk on the excess fabric at their feet. Anyone else have this issue?
Seam allowances are 3/8" or 1cm in the front and back rise, as well as the inside leg. The hem is 2", so 1" folded twice, and the waistband is 1/2" then a 1" fold.
Sizing is as follows:
| Size | Height | Inside Leg |
| 18 m | 86cm / 34" | 34.5cm / 13.5" |
| 2 | 92cm / 36" | 38cm / 15" |
| 3 | 98cm / 38.5" | 41cm / 16" |
| 4 | 104cm / 41" | 44.5cm / 17.5" |
| 5 | 110cm / 43.5 | 48cm / 19" |
Instructions
1. Print your pattern, make sure your printer is set to 'no scaling' or 'actual size'. First print page no. 2 alone if you are worried about your printers settings. Cut and put together your pattern pieces, matching up the numbers and letters on the page markers. You will see that on page 2, there is your missing rise piece, cut it out and paste to the right place.2. If you don't mind printing again, you can go ahead and cut the size you need. Or alternately, you can trace off the size you have chosen onto light sew in interfacing, to preserve the original pattern.
3. It is important to cut out 2 mirror image pieces of the pants legs. For the smaller sizes you will be able to fold the fabric in half and cut once, but for the size 4 and 5 it is important to flip the pattern piece when you cut the second leg.
For sizes 18m to 3 years, you can fit the pattern on 112cm (44") wide fabric folded in half selvedge to selvedge. The larger sizes you will need to cut one peice at a time. The larger sizes will need approximately 1.25m (1.5yards) of 112cm (44") wide fabric. This is an my own approximation and it is best for you to double check before you make a fabric purchase.
4. Once your fabric is cut, go ahead and follow yesterday's tutorial to pre-press your pattern pieces. The instructions to follow will assume you have done this.\
5. First step is to sew the back and front rise, fabric pattern right sides together.
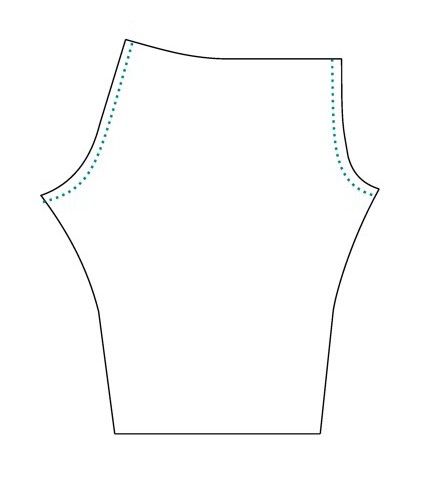

Ignore any advice you have read that says you shouldn't pull a curved seam straight. It is much easier, and has no ill effects. These pictures are dramatic to show you my point, my hands would be in different positioning for actual sewing and not so far back.

6. Finish both seams. Here I have overlocked, but you can also use a zig zag stitch close to the edge. Here is a great post on different seam finishes. When I don't overlock, turn and stitch is a favourite of mine.

7. Next, it is time to press those seams open or to one side, depending on what seam finish you have chosen. Take care not to iron out your pre-pressed waistband. You can see here below that mine didn't line up perfectly, but no worries! When I refold it, it will find its own happy middle ground and settle in fine :)

8. Now we sew the inside leg seam, fabric right sides together.
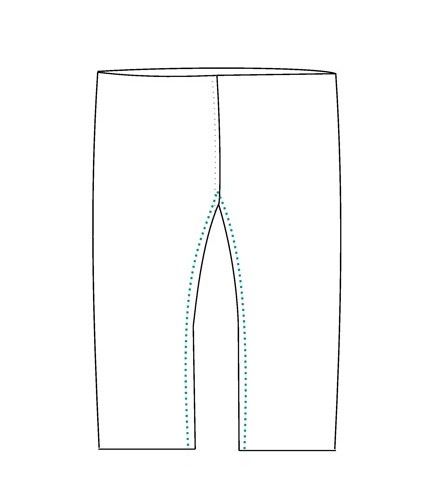

I only pin in one spot, the two rise seams which I would like to match nicely. If you are going to pin, start at this point and pin down each leg. But hey, give it a go without pinning, its not that bad :)
Go ahead and sew the inside leg seam.

9. Now prepare your waistband casing and hems to be sewn. Refold carefully on their pre-pressed creases, and iron once more just to set them in place.


You can see below I have pinned at the curve of the waistband, this is because it is the area most at risk for shifting while I am sewing. I don't pin the rest because I am confident its not going to move, I have pressed it really well and can hold the creases in place without pins. I have pinned the wrong direction here (oops). Your pins should face towards your presser foot as you are sewing, so that you can sew closely to them and remove them easily too. But you can pin in whichever way you please.

10. Now we are ready to sew them shut... Oh! And also, if you are not confident that you will remember to leave an opening for the elastic, please place vertical pins 2 inches either side of the centre back seam, in the waistband. This will clearly mark for you where to start and stop. And if you stuff it up and accidentally leave the gap at the front seam, who cares? Haha!

You are supposed to sew hems with the right sides facing up, but on PJ pants I ignore that advice. (The reason you are 'meant to' is because bobbin stitches never look as good as the top ones do).

I sew close to the edge by lining up the edge of the hem fold to the gap in the middle of my presser foot. Then I change the needle position a few clicks to the right. Now as I sew, if I just keep an eye out to make sure that the edge of the fabric is always lining up in the centre gap of my presser foot, the seam will sew nice and close to the edge.
11. Sew your hems closed, and sew the waistband, remembering to leave an opening for the elastic.


Measure some elastic around your child's waist and cut the elastic to a snug, but not too snug length. If you don't have a child to measure, the approximate waist measurements I have are:
18m - 18", 2y - 19", 3 - 19.5", 4 - 20", and 5 - 20.5".
These measurements allow a 1" overlap of the elastic. If you are unsure of size, check on a child before sewing the final gap closed.
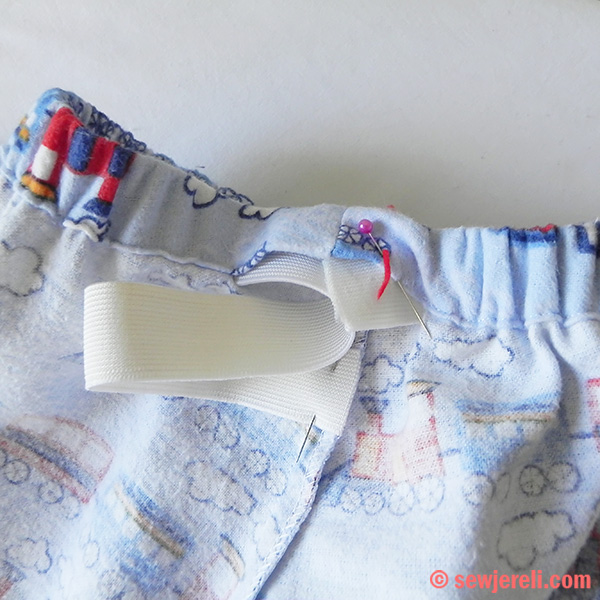
Sew the ends of the elastic together using a zig zag stitch, going back and forth a few times.
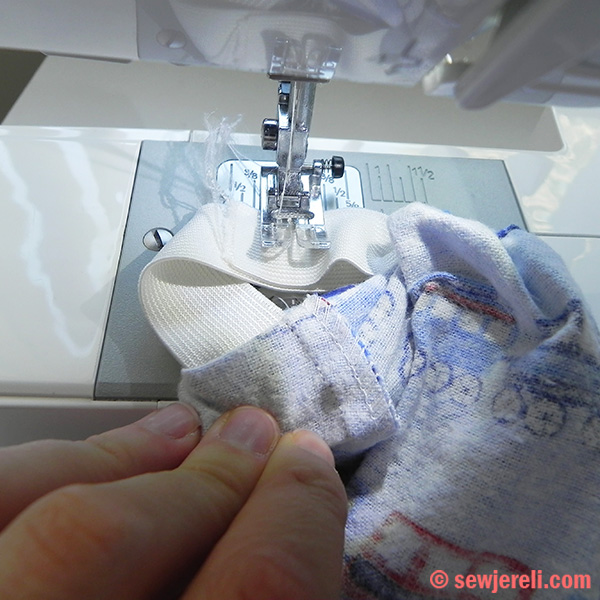

Sew the opening shut, and your finished!


Any issues at all, please don't hesitate to contact me by email at: sewjereli (at) ymail (dot) com.
:) Make sure you come back and tell me how your Pj pants turned out!
x

Thank you for the pattern, I have it and now I wait for nap time to give it a go :)
ReplyDeleteFantastic tute! I've already got my pattern printed out... just need to stick it all together and get cutting and sewing!!!
ReplyDeleteThankyou, this pattern looks great! I will be on a sewing mission when I get home :)
ReplyDeleteLOL! Yes, I unintentionally left the gap at the front seam, but my son doesn't care ;) And yes, as a total novice, these gave me a huge sense of achievement and encouragement that yes, I CAN sew clothes!
ReplyDeleteGreat tutorial! Your sewing is so neat :) Love the little tag!
ReplyDeleteThis is a wonderful tutorial and thank you for your generosity with the free pattern too!
ReplyDeleteThanks for the pattern and tutorial! I am a beginner and this looks like I might be able to manage making a pair. I will try!
ReplyDeleteThank you for the pattern and the explanations, I will try to do some for my twins, almost 4 years old. I will send you some picture if it's a success !
ReplyDeleteAn your little boys are really cute !
Have a nice day !
It looks so easy! Thanks for the pattern and easy instructions!
ReplyDeleteThanks for the pattern and instructions. This is awesome!
ReplyDeleteThis is so good. Pattern cutting very clever and sewing instructions very clear.
ReplyDeleteWonderful tutorial! I loved the outcome!
ReplyDeleteGreat post!! I included it in my post Βόλτα στη Γειτονιά!!! ...while sewing!! :)
Have a great weekend!!
thank you for this tutorial and pattern!!! I was surprised that I was able to do it! I can't wait to make more!!! thank you again. I will probably post some pictures on my blog soon and will link up to your page!
ReplyDeleteI have just finished making my first pair of PJ pants. The pattern was super easy & quick. They look great on my daughter so thank you :)
ReplyDeleteAmanda xx
I added this to my KCW shout out this week!
ReplyDeletehttp://seemesew.blogspot.com/
Yay - I'm totally using your pattern for Christmas pajamas for my little ones!! :)
ReplyDeleteYay - I'm totally using your pattern to make pajams for my little ones this Christmas!! :)
ReplyDeleteWhat a wonderful tutorial. I've never thought about little flags so you know the size. My mom and consequentially myself also add a quick button on the tummy side to little one's know what side is the front.
ReplyDeleteI see where you write that the waistband is a 1 inch double fold but does that mean I use 1 inch elastic or should I use smaller? Thanks!
ReplyDeleteThank you so very much for taking the time to include an actual pattern with your tutorial. I'm printing it out as I type this note. Although no-pattern versions using a kiddo's existing wardrobe are fast and easy, not everyone has access to the kiddo they're sewing for. My 3 yr old nephew in Massachusetts is going to look mighty cute in his Christmas pj's from his aunt in Florida because of you. Thank you again! ~ Carey
ReplyDeleteThank you!
ReplyDeleteWolke
Thanks for the pattern and the easy-to-follow instructions. These were fun to make! I'm going to put them in a "Movie Night" gift to my nieces along with popcorn, cocoa, and a kids' movie:)
ReplyDeleteThanks so much for the step by step. This is my first sewing project and came out really well
ReplyDeleteWow Jeena! They look so fantastic. I love the sports fabric!
ReplyDeletenot finding the pattern. I signed up for the newsletter and was directed back to this website from my email and still dont' see where to click for the pattern to print out. I must not be seeing it.....help anyone? thanks, kc in ky.
ReplyDeleteSorry KC, will email you now!
ReplyDeleteLooking so forward to following you! I am a new sewer and look forward to trying my hand at the pj pants for my 16 month old. How do I download the pattern?
ReplyDeleteHi Sarah-Lee, if you follow this link to sign up [ http://eepurl.com/Mfe49 ] you will receive a final welcome email with the download link. :)
ReplyDeleteI have made 3 pairs so far and am in love with how simple this pattern is.
ReplyDeletethank you so much! can't wait to get home and try it out!
ReplyDeleteNot sure what I did wrong (this is my first project) but I used the pattern for size 4 and ended up getting pants 19 inches long from waist to bottom of the leg and the leg itself was 13 inches, I must have been quite a ways off on my hem but it doesn't look it. I made sure I folded 1" twice for the legs and then half inch plus another inch for the waist. Came out super cute anyway just going to have to try and find a way to make it much bigger for my kiddo.
ReplyDeleteOh Amy, sounds like a printing error. Can you please check the inch square? You have to make sure that 'no scaling' or 'actual size' is selected.
ReplyDeleteJust to say, what handsome little guys!
ReplyDeleteHello! Thank you so much for the amazing pattern I just have one question. You talk about an extra rise piece being put where it needs to go but I don't see anywhere that piece should go. I must be missing something super obvious haha.
ReplyDeleteIts only for the largest sizes, maybe you don't need it? :)
ReplyDeleteThanks for the great pattern! I made the 18 month first but they were to big so I took 1/2" off all the way around and an extra inch again on the hem and they're perfect! Excellent, clear instructions. First garment I've ever made.
ReplyDeleteAwesome tutorial! I made my oldest a pair from a fleece blanket I had laying around and included it in my new blog http://woldringsknits.blogspot.com/2014/11/eekfirst-post.html
ReplyDeleteJust made a pair of the sweetest pyjama bottoms! The first item of clothing I have made in over 30 years since being traumatised by a horrible sewing teacher at school!! I need to try this pair on one of my twin nieces before embarking on another pair for the other one. Thanks so much for this great pattern and instructions.
ReplyDeleteFirst of all, thank you for putting forth the effort into providing a free pattern.. however there needs a 'room' for improvement in this pattern. I cut out and sewed a pair in size 4t with cotton flannel, for my 3 year old skinny, butt-less, average height son. Honestly, there isn't enough 'room' in this pattern for the average bubble butt toddler. The crotch and behind isn't very roomy and he would pull on the part that kept getting 'ate up'. I was horrified at how little room there was in the trunk, and even resewed a tighter seam allowance (from 3/8" as per direction to a 1/4") not that it made a huge difference. The length was also on the short side, so I suggest sewers cut the length a little longer (1-2 inches more) and hem from there. He loved it regardless, but for the next one I will have to tweak the pattern to make it more higher rise, wider width, and roomier in the bum and thighs. I need something they can move around in, and pants that won't creep down low when they squat.
ReplyDeleteThank-you for this pattern. It was easy to follow, and the pictures really helped. This was my first sewing project, and I made 2 pairs of pants very quickly. I hyperlinked to this page from my blog at justabitoftime.wordpress.com, where I put a couple of pictures of my finished product. I have signed up for your newsletter. Thank-you again.
ReplyDeleteNot sure on how to cut and sew the front rise.Please help
ReplyDeleteGreat pattern! I had a child's pant pattern but it had four pieces. This is quicker and doesn't need to be fitted. I had an old flannel sheet that was so soft but didn't fit any of our beds anymore, so I cut it up! This made a great size 4 pj bottom for my nearly 3 year old granddaughter. Sheets are a great source for cheap fabric, I have so much left. Oh, I couldn't resist adding the bottom ruffles.
ReplyDeleteThanks for the pattern can't wait to try it out :)
ReplyDeleteHi Toni, I've linked your pattern to a blog post that I'm posting on Saturday. The post is about a group of Charity stitchers who are using your pattern to make pyjamas for children going for heart surgery. Hope this is okay!
ReplyDeletesewdarnneat.blogspot.com
Thanks this is a great pattern. Just wondering why there isn't a grainline on the pattern?
ReplyDeleteI recently made these Superman PJ pants for this the Pokemon doll below. I made it and the pants last summer. I've used this PJ pants pattern to make the Superman pants and several other pairs of pants. I even made the doll a pair of soccer shorts using this pattern by folding the leg shorter before cutting.
ReplyDeleteThe grainline usually runs up and down, so the grainline for this pattern runs from the waist down to the leg hems.
ReplyDeleteThank you so much! This was the first time I followed a pattern all by myself and it was really easy! And I have an inexpensive birthday present for my niece during a tight month!
ReplyDeleteI ADORE this pattern and have used it to make many pairs of pants. I just wish my kiddo would stop growing because he'll soon be out of a 5!
ReplyDeleteThanks for this free pattern. I found your site via a Pintrest link and I'm now subscribed to your mailing list :)
ReplyDeletesomehow i'm completely failing at this pattern...horribly
ReplyDeleteThank you for share this pattern.
ReplyDeletethank you very much for the pattern !!
ReplyDelete